Balcony Power Plant: Mounting and Installation
Balcony power plants are distinguished primarily by being space-saving and easy to install. But how exactly are the PV modules and inverter installed? Where can balcony power plants be mounted?
Structure of a Balcony Power Plant
A typical balcony power plant consists of just a few components:
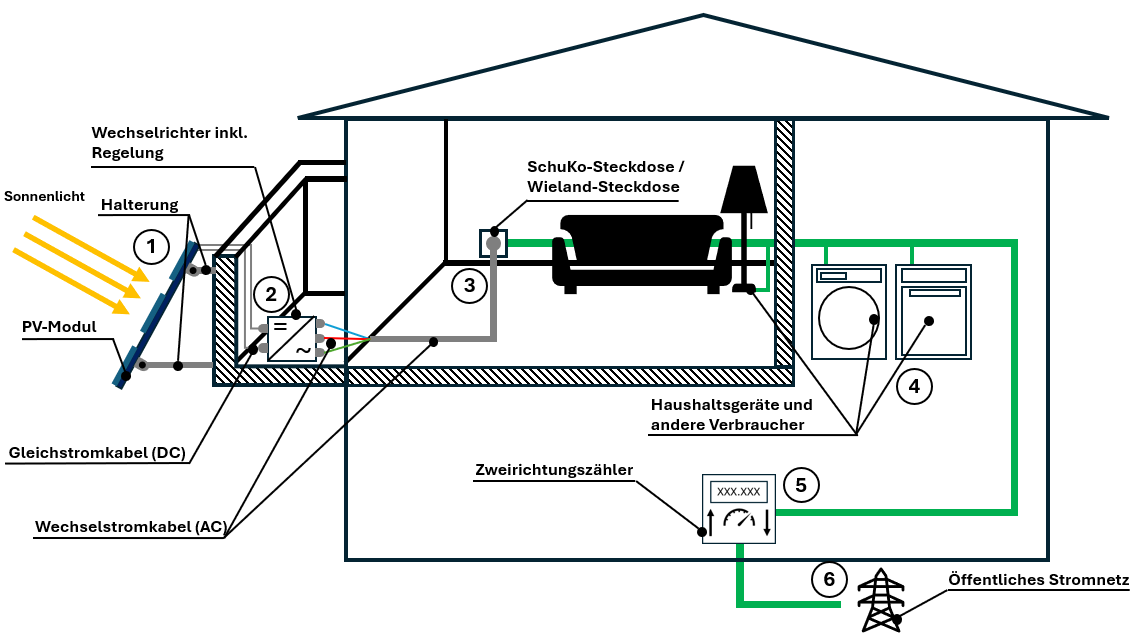 Schematic structure: From solar module to socket
The Components in Detail
| No. | Component | Function |
|---|---|---|
| 1 | PV modules | Generate direct current from sunlight |
| 2 | Inverter | Converts direct current to 230V alternating current |
| 3 | Socket | Schuko or Wieland connection |
| 4 | Household appliances | Use the generated electricity directly |
| 5 | Bidirectional meter | Records feed-in and consumption |
| 6 | Public grid | Absorbs surplus electricity |
The Electricity Flow
- Sunlight strikes the PV modules
- Direct current (DC) flows to the inverter
- Alternating current (AC) is fed into the house grid
- Consumers use solar power first
- Surplus flows into the public grid
Mounting Locations at a Glance
Balcony power plants can be mounted in various locations – not just on the balcony:
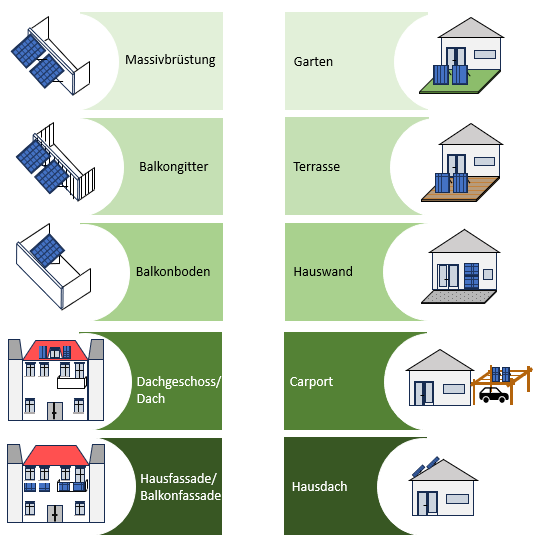 All mounting locations for balcony power plants at a glance
1. Mounting on the Balcony
The classic option for city dwellers:
| Mounting location | Tilt angle | Specifics |
|---|---|---|
| Balcony railing | 30°–90° | Often with tilt frame |
| Solid parapet | 30°–90° | Stable mounting possible |
| Balcony floor | 7°–35° | If sufficient space available |
Advantages of balcony mounting:
- No roof work required
- Easy cable routing to socket
- Modules can be taken along when moving
Disadvantages:
- Often not optimal south orientation
- Possible shading from buildings
- Consider railing structural capacity
2. Mounting on the Facade
The modules are attached to the wall with special brackets:
| Aspect | Details |
|---|---|
| Tilt angle | Usually 90° (vertical) |
| Yield | Lower than roof, but stable year-round |
| Advantage | Self-cleaning through rain |
3. Mounting on Terrace/Garden
A good alternative if sufficient space is available:
| Aspect | Details |
|---|---|
| Installation | Freestanding brackets |
| Tilt angle | Optimally adjustable (30°–35°) |
| Advantage | Flexible orientation possible |
| Disadvantage | More space required |
4. Mounting on the Roof
Technically like a normal solar system, but in mini format:
| Aspect | Details |
|---|---|
| Suitable for | Attic flats, carports, garden sheds |
| Tilt angle | 7°–50° depending on roof pitch |
| Installation | Professional recommended |
The Inverter
The inverter is the "brain" of the balcony power plant:
Main Tasks
- DC to AC: Converts direct current to household alternating current (230V/50Hz)
- MPPT: Maximum Power Point Tracking for optimal output
- Control: Monitors and controls the system
- Safety: Switches off in case of grid failure (islanding protection)
Mounting Options
| Variant | Description |
|---|---|
| External inverter | Separate box, mounted behind the modules |
| Module inverter | Integrated directly into the module |
Battery Storage: Worthwhile or Not?
A battery storage system can store the generated electricity:
Advantages with Storage
- Electricity usable in the evening/at night
- Higher self-consumption
- Buffer power peaks
Disadvantages
- Higher acquisition costs
- Additional mounting effort
- Often not economically viable for balcony power plants
Note: For most balcony power plant operators, a battery storage system is not economically worthwhile. The payback period is extended considerably.
When Do I Need a Professional?
| Situation | DIY possible? |
|---|---|
| Schuko plug, max. 800W | ✅ Yes |
| Wieland plug | ❌ Professional required |
| Direct wiring | ❌ Professional required |
| Roof mounting (pitched roof) | ⚠️ Recommended |
| Bidirectional meter installation | ❌ Grid operator/professional |
Legal Regulation
The legal framework stipulates that plug-in solar devices with Schuko plug up to 800 W may generally be installed by laypeople.
Checklist for Mounting
Before installation:
- [ ] Check location for shading
- [ ] Ensure structural capacity of mounting
- [ ] Plan orientation (ideally south)
- [ ] Check cable length to plug
- [ ] Bidirectional meter present?
During installation:
- [ ] Securely fasten modules
- [ ] Mount inverter weatherproof
- [ ] Route cables neatly
- [ ] Plug in and check function
After installation:
- [ ] Register system in Market Master Data Register
- [ ] Monitor yield regularly
- [ ] Clean modules as needed
Conclusion
Key Point: Mounting a balcony power plant is possible without professional help in most cases. Besides the classic balcony, terraces, facades and roofs are also suitable as mounting locations. Important factors are secure mounting, correct orientation and a functioning bidirectional meter.
Continue reading: In the next article Technical and Legal Requirements, you will learn everything about tilt angles, orientation and legal requirements.